
White Balance This function can help your camera work well in reduction of the color, available options for White Balance Setting are: Auto/Cloudy/Daylight/Tungsten/Fluorescent/Blue/Light Blue/Red/Light Red/Custom Since white balance setup depends on the situation you are in and the effect you are trying to achieve, it is the best to experiment with these features.Ĭustom White Balance Set If the white balance option is set as custom, you can use this option to adjust the blue and red color value. Like in this video, the user set both the R(red) and B(blue) value to 6.

It is not the 16 megapixel photo, it is an exported video frame. If this is turned off, you can also shot press the mode button to take one video snapshot. Video Snapshot Timer It will take a video snapshot while recording in every interval. Available Intervals for snapshot are: 5/10/20/30/60 seconds. ĭate Stamp Turn the Date Stamp on, then the date/time stamp will be shown on the screen, and it display in the right bottom color of the video.

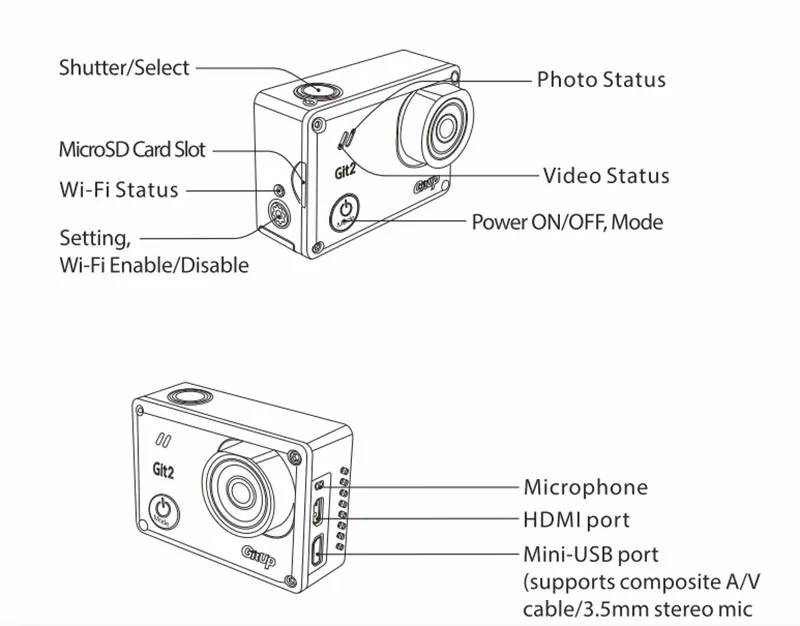
Record Audio Level Available options for Record Audio Level are high, medium, low and mute, you can choose the appropriate level in different conditions. Loop Recording Available Intervals for Loop Recording are 2,3,5,10 minutes. For example, if you set the looping interval into 2 minutes, when you record 10 minutes video, the video will be saved into 5 files that each file lasts 2 minutes. What's more, the last file will be covered by the latest file when SD card will be full.It is useful if you use GIT2 as a car/dash camera If the loop recording options is off, it will record max 4GB file, and start to record next file once the file is reached 4GB until the card is full. GitUp Git2 includes the video resolutions listed below. Selecting Camera Modes Press the Power/Mode button repeatedly to cycle through the camera modes,there are four modes for Git2: Video;Photo;Playback;SetUpĪdjusting Camera Settings 1. Press the Power/Mode button to cycle to your desired mode; 2. Press the Setting/WiFi button to enter the setting menu for that mode; 3. Press the Power/Mode button to cycle through the options; 4. Press the Shutter/Select button to select your desired option; 5. Press the Setting/WiFi button to exit the setting menu Powering Camera On and Off 1. To power on:Press the Power/Mode button for two seconds; 2. To power off:Press and hold the Power/Mode button for four seconds. Git2 Manual From GitUp Action Camera Document and Support Git2 Manual GitUp Action Camera Document and Support


 0 kommentar(er)
